
Sewing machines are amazing pieces of technology, but for many beginners, understanding all the settings and tension numbers can be overwhelming. Sewing machine tension numbers are often misunderstood, leading to confusion and frustration for sewers.

In this blog post, we’ll explore what sewing machine tension numbers mean and how you can use them to get perfect stitches every time. We’ll also look at common problems that arise when using incorrect tension settings, With our guidance, you can finally have a better understanding of your machine’s settings and achieve great results with each project!
Sewing Machine Tension Numbers: Complete Analysis
When it comes to sewing machine tension numbers, there are a few things you need to know. First, what do the numbers mean? The higher the number, the tighter the stitch will be. The lower the number, the looser the stitch will be. Second, how do you adjust the tension on a sewing machine? And finally, what are some of the most common problems that can occur when tension is not set correctly?
Number one: What do sewing machine tension numbers mean?
The numbers on your sewing machine tension knob indicate how tight or loose the stitches will be. If you want tighter stitches, you would use a higher number; if you want looser stitches, you would use a lower number. The default or middle setting is usually 4 or 5.
Number two: How do you adjust the tension on a sewing machine?
If your stitches are too loose or too tight, you can adjust the tension knob on your sewing machine until they look just right. To do this, simply sew a test seam on a scrap piece of fabric and then hold it up to the light to check the tension. If the stitches look too loose, turn the knob to a higher number; if they look too tight, turn the knob to a lower number. Keep adjusting until you get it just right!
Number three: What are some of the most common problems that can occur when tension is not set correctly?
If the tension on your sewing machine is not set correctly, it can cause a variety of problems. The most common problem is that the stitches will be too loose or too tight. This can cause the fabric to pucker or gather, and it can also make the seams difficult to sew.

Another common problem that can occur is that the needle will start to skip or miss stitches. This can be caused by the needle being too far to the left or right, which means that it is not hitting the fabric evenly. This can also be caused by the tension being too tight or too loose. If the tension is too tight, it can cause the needle to break; if it is too loose, it will skip stitches.
Finally, another problem that can occur is that the thread will break frequently. This can be caused by a number of different factors, including incorrect tension, incorrect threading, and using a lower-quality thread. If you are having problems with breaking thread, try adjusting the tension and/or using a higher-quality thread.
Sewing Machine Tension Problems
If your sewing machine tension is too loose, your stitches will be too long and you may have skipped stitches. If the tension is too tight, your stitches will be shorter than normal and you may have birds nesting. To fix either of these problems, you’ll need to adjust the tension on your sewing machine.

To start, try adjusting the tension knob on your sewing machine to see if that solves the problem. If that doesn’t work, then you’ll need to consult your sewing machine manual to find out how to adjust the tension more precisely.
Once you’ve adjusted the tension, test it out on some scrap fabric before moving on to your project. This way you can make sure that the new setting is just right and avoid ruining your project with too loose or too tight stitching.
Understanding of tension tools
When it comes to sewing machine tension, there are a few key things to keep in mind. First, tension is created by the interaction between the upper and lower threads. The upper thread is under more tension than the lower thread, which is why it’s important to have your top thread slightly looser than your bobbin thread.
Second, the type of fabric you’re sewing with will also affect tension. Different fabrics require different levels of tension, so it’s important to test out your stitches on a scrap piece of fabric before you start your project.

Third, pay attention to your needle size. Using a smaller needle will create more tension than using a larger needle. This is because the smaller needle has less space to move around, so the threads have to work harder to get through it.
Finally, make sure you’re using the correct presser foot for your project. Different presser feet can affect the tension in different ways, so it’s important to choose the right one for your project.
By keeping these things in mind, you’ll be able to sew with confidence and get beautiful results every time!
How To Set Sewing Machine Tension Adjustment
If your sewing machine tension is not set correctly, your stitches will be uneven and may even pucker. To avoid this, it’s important to know how to set the tension adjustment on your machine.
There are two ways to adjust the tension on a sewing machine: manually or with a knob. If you have a knob, simply turn it until the needle penetrates the fabric at the correct tension. If you’re adjusting tension manually, you’ll need to raise or lower the presser foot lever to loosen or tighten the thread.
Once you’ve adjusted the tension, test it out on a scrap piece of fabric before moving on to your project. This will help you ensure that your stitches are even and clean.
Recognizing Balanced Tensions
As we all know, every good thing in life comes with a certain amount of tension. The key to a happy and balanced life is finding ways to manage and cope with that tension.
The same can be said for sewing machines. To function properly, sewing machines need to have the correct amount of tension. If the tension is too loose, the stitches will be too loose and the fabric will pucker. If the tension is too tight, the stitches will be too tight and the fabric will pucker.

The best way to achieve balanced tensions is by using a seam gauge. A seam gauge is a tool that helps you measure the tension of your stitches. By using a seam gauge, you can adjust the tension of your sewing machine so that it is just right.
If you don’t have a seam gauge, don’t worry! There are other ways to achieve balanced tensions. One way is by trial and error. Another way is by following the instructions in your sewing machine manual.
Once you find the perfect tension for your sewing machine, stick with it! This will ensure that your stitches are always nice and even.
Factors that Affect Stitch Balance
Several factors can affect stitch balance on a sewing machine, including the type of fabric being sewn, the thickness of the fabric, the type of thread being used, the tension of the thread, and the tension of the machine itself.

When sewing with a lighter fabric, it is important to use a lower tension setting on the machine, as too much tension can cause the fabric to bunch up or pucker. Conversely, when sewing with a heavier fabric, a higher tension setting may be needed to prevent the thread from breaking.
The type of thread being used can also affect stitch balance. A thicker yarn will require a higher tension setting than a thinner thread. Additionally, if using two different types of thread (e.g., polyester and cotton), it is important to adjust the tension accordingly so that both threads are feeding through the machine at an even rate.
Finally, the tension of the sewing machine itself can impact stitch balance. If the machine is set too loose, stitches may be uneven or appear loopy. If the machine is set too tight, stitches may be pulled too tightly and cause puckering or gathering in the fabric. The best way to determine the ideal tension setting for your sewing machine is to experiment with different settings until you find one that produces consistent, even stitches.
Brother Sewing Machine Tension Chart
If you’re having trouble getting your sewing machine to produce neat, even stitches, it might be due to incorrect tension. Tension is one of the most important factors in producing quality stitches, so it’s important to get it right.
There are a few different ways to adjust the tension on a sewing machine, but the most common is to use a tension dial. This is usually located near the needle on the front of the machine.

Every sewing machine is different, so it’s important to consult your machine’s manual for specific instructions on how to adjust tension. In general, though, you’ll want to start by threading the needle and raising the presser foot. Then, turn the tension knob until the needle is correctly positioned in the center of the presser foot.
Once you’ve got the needle positioned correctly, take a look at your stitches. If they’re too loose, turn the tension knob slightly to the right until they’re tight enough. If they’re too tight, turn the knob slightly to the left until they loosen up.
It can take a bit of trial and error to get the tension just right, but once you do you’ll be able to produce beautiful stitches on any fabric!
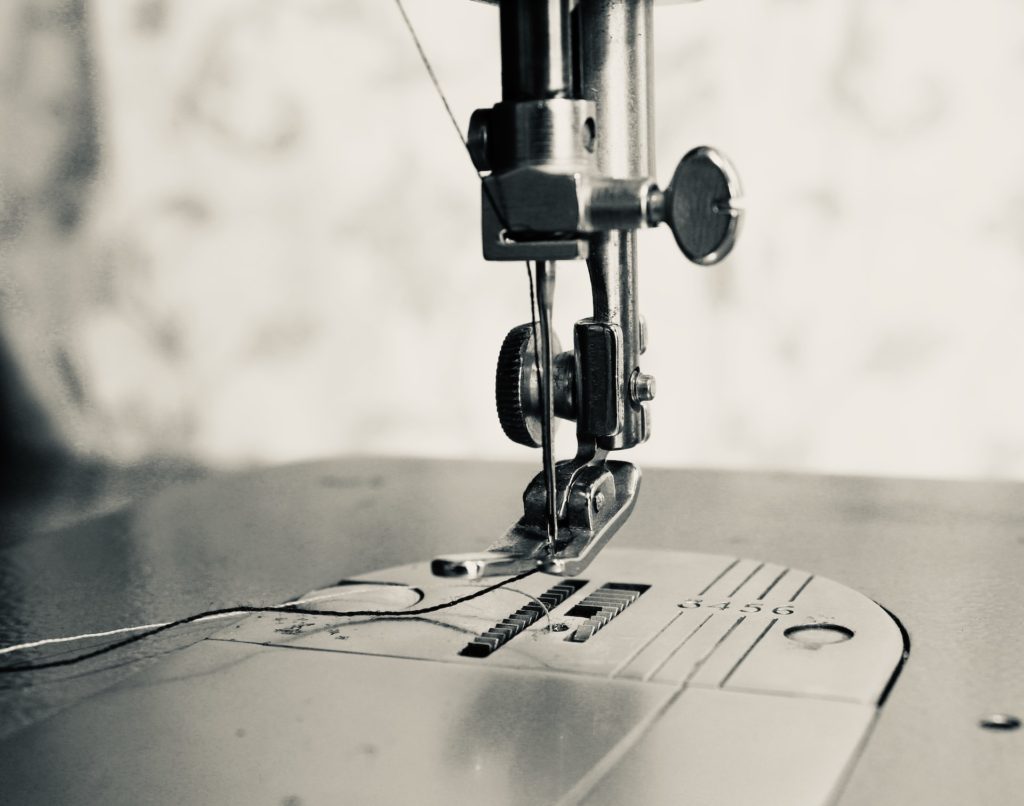
Tension devices and proper threading
There are a few key tension devices that are important to understand to get your machine threaded correctly.
The first is the take-up lever.
This is the small lever located at the top of the sewing machine near the needle. Its purpose is to pull up the bobbin thread, and it should be set at its highest point when you begin threading your machine.
Next is the tension disk.
This is a small, round disk located under the take-up lever. It regulates how much tension is placed on the thread, and should be turned clockwise until it’s snug against the take-up lever.
The last key tension device is the presser foot.
This metal foot is located at the front of the machine that holds the fabric down while you sew. Be sure to lower this before you start sewing, or else your stitches will be very loose.
Singer Sewing Machine Tension Chart
If your sewing machine is producing uneven stitches, the tension may be to blame. To fix this, you’ll need to adjust the tension on your machine. But how do you know which tension setting to use?
That’s where a singer sewing machine tension chart comes in handy. This chart will tell you which tension setting to use for various types of fabric.

To use the chart, simply find the type of fabric you’re working with and follow the corresponding tension setting. For example, if you’re sewing with cotton fabric, you would use a tension setting of 4.
Keep in mind that these are only general guidelines. You may need to experiment with different settings to find what works best for your particular project.
Thread Tension Chart
Most sewing machines will have a tension dial with numbers on them. These numbers indicate the amount of tension that will be applied to the upper thread as it passes through the machine.
The numbers on the tension dial range from 0 to 9, with 4 being the neutral setting. The lower the number, the less tension that will be applied, and vice versa.
You’ll need to experiment a bit to find the right tension setting for your particular sewing project. A good rule of thumb is to start with a lower number and increase it if your stitches start to pucker or loosen.
If you’re not sure what tension setting to use, consult your sewing machine’s manual or look for a helpful chart online.
Conclusion
So now you know sewing machine tension numbers in detail. I know Adjusting the tension on a sewing machine can be daunting but with a little practice and patience, you will soon get the hang of it. Knowing what your sewing machine tension numbers mean and how to adjust them correctly is key to ensuring that you achieve professional-looking results from your projects.
We hope this article has provided some useful information about understanding different types of tensions and how to adjust them properly. With this guidance, you’ll no longer have to worry about uneven stitching or fabric bunching up underneath!
FAQs
Q: Why thread tension is important to know?
A: Thread tension is the force that holds a thread together. It’s important because it affects how tightly the stitches will hold, which in turn affects the strength and durability of your project.
Q: What is thread tension in easy words?
A: Thread tension is the amount of force needed to pull a thread through a needle. It affects the strength, flexibility, and durability of fabrics. Too much tension can cause wrinkles in the fabric or even damage it.
[…] Next, check your tension discs to make sure they are tight enough. If they are not tight enough, the thread will be able to slip and break. […]
[…] of the top thread. If it’s too loose, the stitches will be loose and uneven. Tighten the tension until the stitches are even and consistent. Finally, check the presser foot pressure. If it’s […]
[…] tension that is too tight-The needle is not properly inserted-The bobbin case is not correctly […]
[…] If you’re using a machine, make sure that the presser foot is properly attached and that the tension is set […]
[…] tightened. If the needle is loose, it will cause the stitches to be loose as well.Next, check the tension on the sewing machine. The tension should be set to medium or just below medium. If the tension is […]
[…] sewing machines, which required the user to manually select the stitches and control the speed and tension of the machine.Over the next few years, computerized sewing machines became more advanced, with more […]
[…] you need to get started working with denim on your sewing machine. Remember to pay attention to tension, thread type, and needle size when crafting your project for the best results. Now grab some denim […]
[…] it may be helpful to use a darning egg or mushroom underneath while sewing. This will help keep the tension even and prevent stretching in surrounding areas.As you sew, periodically check on both sides of […]
[…] is too narrow, the fabric may not be strong enough to hold the stitches. Second, check the tension. If the tension is too tight, the stitches may pull out easily. Third, check the thread. If the […]
This is very nice Explannation of Sewing Machine. I got it very helpful. Thanks to share this article.
I run a Sewing Machine Website & I also share this type of tips. But,you are batter than me.